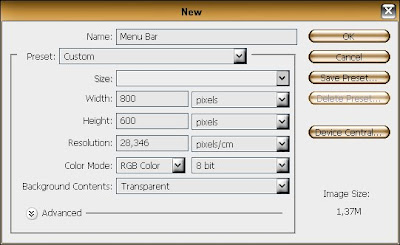
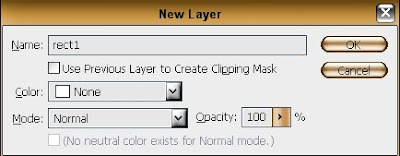
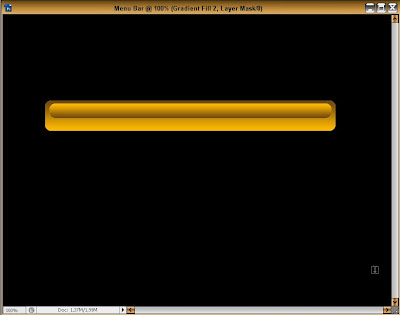
1- Start a new file and configure it like this:
![](https://blogger.googleusercontent.com/img/b/R29vZ2xl/AVvXsEjtu6c9BC8gcvm9HbONwnLFb8f17i_NvK40NrPfANK2JcrP8R0Hw2YtlQOk-9ou1xJru5XVTNAz5mZSTktLQnLPSvpYo51YtupTszpi9cdIgqYrxhK8KQb7okb_Ljs58qoQXy9UFwY_6ng5/s400/1.bmp)
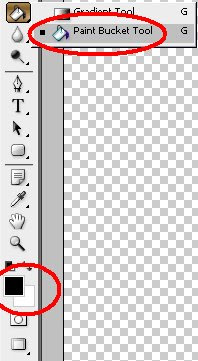
2-Select the
Paint Bucket Tool and left click on the background
![](https://blogger.googleusercontent.com/img/b/R29vZ2xl/AVvXsEiYmazCjLOJ8mLoeIdW9ViRU6uCT8dKo_U_KaMsJBm3bpSU65qrJtSU1zFdfFNLVEtcGt4SuEh5dULzGNkN4moq_YWWiwkh7nlzGcFpEKg0DyOKVfh5K9x5ck7JBtvYnxnPkZ7aOWtT6SZl/s400/2.bmp)
3- Press
Ctrl+Shift+N to create a new layer
![](https://blogger.googleusercontent.com/img/b/R29vZ2xl/AVvXsEhPlGV2WJMs4o0fnlydvTgG7Ex4adX2VA5LlvEP_1PGtSLXr3_hiUXHOS2dw0Uj08VAWCdtpXU3_AOMvpKOIpO9_hZFiIjwyfG6sED-IEQ4CEgj11KpoXuRn47lfgPzDBbmyYxg6_2V5_FA/s400/3.bmp)
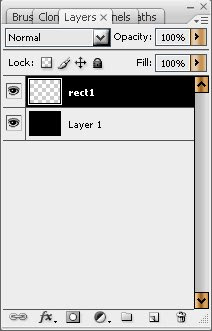
4- And your layer palette will be shown like this
![](https://blogger.googleusercontent.com/img/b/R29vZ2xl/AVvXsEgL11Etfhac5M4RsZ4Dc1gpUI-S7efUUsfzBi9woCu0aMH2oafYdhUcb4eqJw2W_prWNRs6HUMfR8nF8lbl9sJdy98BOU1h_NxsxqnPcLk2qfh1hMezvINzSy95_oUvdBdZO8u-M7jiEk56/s400/4.bmp)
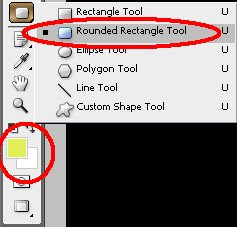
5- Select the
Rounded Rectangle Tool with a different color of the background
![](https://blogger.googleusercontent.com/img/b/R29vZ2xl/AVvXsEiETBRB2GjTJCsfeA_vBByFfE080M5GV8IWNyoRiJUuhhgCXg8aidXqpWC3dB-7dcfBYVqsiiqhvCSlV6zX3BbgfqTmpB-bTMoEoymIFf5sUA4cyNFMuawfL_50MyH5Qx5kogdtMWBuC-us/s400/5.bmp)
6- Look up with the
Rounded Rectangle Tool selected and make sure everything's configured like this:
![](https://blogger.googleusercontent.com/img/b/R29vZ2xl/AVvXsEih7EfS4CxWJRebBkCih7wp6Cn1tvQpEInN_L8QlX8VrDxZkUQtW1WedU9xQKNvwPRl3wFq0zDK_H1-i2oQqTuIPZIU8txnRNJG4B5TRhkKksFo1yT57DeIPwq0c60UnhyphenhyphenAnQTT2Tab_UIn/s400/6.bmp)
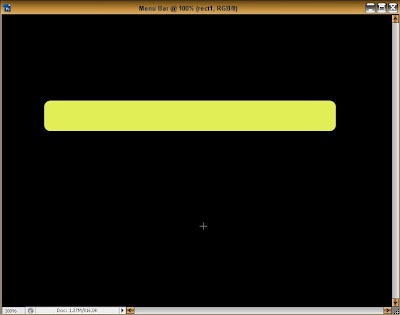
7- Draw a rectangle on the background
![](https://blogger.googleusercontent.com/img/b/R29vZ2xl/AVvXsEjX6FkzKH8vKARLDJa8UyTQrqXIjoKJHfeDdKRvluS_TLDK3Gn_7IGtL_FupGd95vQv14QORI0Lm9tf4vU2wvRAI9B0vyyOO5_REfOaPNJQlyC_Pxq22EJyKp8XixYe5c0_N2IAX3zgmTQS/s400/7.bmp)
8-Go to
SELECT>LOAD SELECTION>OK9- When you click OK your rectangle will be shown like
![](https://blogger.googleusercontent.com/img/b/R29vZ2xl/AVvXsEiBQYrV00hF2PmRiJDZehttzj5QRA0fgC6Nz_gMrJpLf2Vd6vWE2HqZ-4vdhH2i9pKev6uyrl3rJJd3U4rLYn_aqxnYfCEujhb8LslCv-ZK6d0zfwWRjbrqVcgh4EAN7OOWSAlVC9YE10Nd/s400/8.bmp)
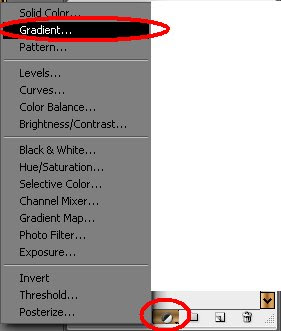
10- Click on
ADJUSTMENT LAYER BUTTON and select
GRADIENT![](https://blogger.googleusercontent.com/img/b/R29vZ2xl/AVvXsEguzlxjsFzGb8n5KnjSutVKAqARnz0y24n-DtYWe1r3u2vqSep-K4CzeFEUQeGEVLxRwkv1UVI82cjm_4w9MVFkQISaiGsw2ZX_yXlnBRPCuky8CN5emcvxbuyuCw00mJiobCtRXpTRA55a/s400/ba.bmp)
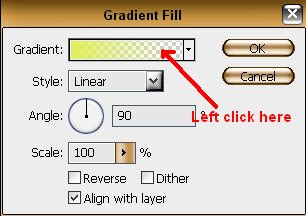
11- Now left click on the gradient box
![](https://blogger.googleusercontent.com/img/b/R29vZ2xl/AVvXsEib7p8k0t5VLqcub9n0Dj_ZWdN0gNdlfT3PpsmV5FUPSq1E060cn4n5EMnmPacProV4spybLZPwwfyIIccoSz_sh3PEf5cGxQ_S_7CCpwYvYiQycxSn9JGAPUTDtB6gdU0lBICQjBoAz4ep/s400/9.bmp)
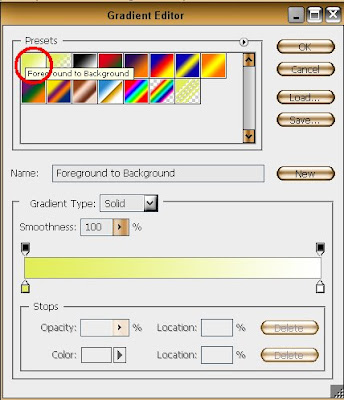
12- Now a bigger box will appear, looks complicated huh? Don't worry ;)
13- Click on the first square, and you will notice that your rectangle changed his colour
![](https://blogger.googleusercontent.com/img/b/R29vZ2xl/AVvXsEiw34Fs8JgJOEz5rp5eSspa-nvOQxt37gQu2YYx9qhxsaqE4Do14EJpOBhcSqq3BudODcGqc1d2_60yp33FErlwuPHDJODH6sqMJfCNRfb52GmATCpUKnNhcbfKKort1OwHPl1pxst2LxpO/s400/11.bmp)
14- But now it's time for to configure the rectangle with our wished colors
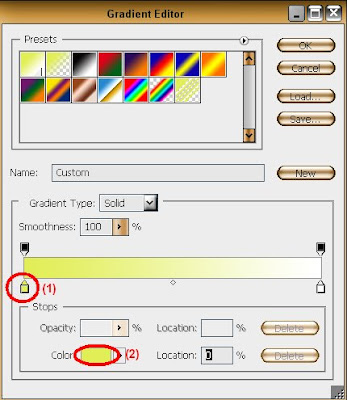
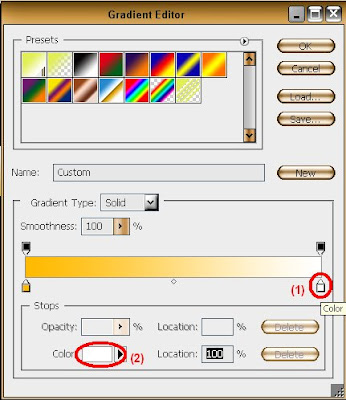
15- Click on that small box with a traingle on the top of it
(1) and then on that bigger box
(2) to choose your first color
![](https://blogger.googleusercontent.com/img/b/R29vZ2xl/AVvXsEg9rIdm6Y9N-OTW3_Ow6GUSEKCs6jUTYgyKynL7G6d4NFOAKVMw6HhFVEdfLvntR41FMBcgW_bwDyyeJExOxTbnM5EVQQUB8PwFzRbQUbwjaTyTn6OPxN8hm6uHPFB6a8eBn91SdGVIhhAD/s400/12.bmp)
16- Choose your color and click
OK (Here I've chosen
"ffba00")
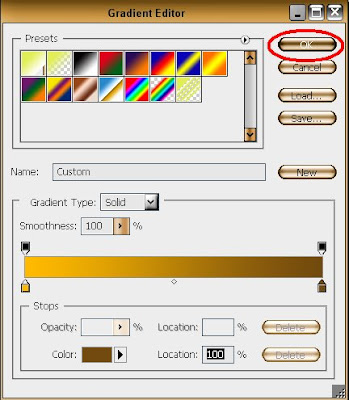
17- Now do the same as step 15 for the right small box
(1) and that bigger one
(2), but for this choose a darker color (Here I've chosen
"72490e") and press
OK![](https://blogger.googleusercontent.com/img/b/R29vZ2xl/AVvXsEhILi3BvWekOxmkpOWniDG4ahlxrF20zK6_Ei0eCc4JX02fAmDE013O4aoCRCqfuN-2oYgqoyRmwv2URh88VjgbdwocjCKNcQ02TnXUe11VJWdim-0roGW4yy8iYfy6Caa_BGKgfQH6UrbL/s400/13.bmp)
18- Press
OK again to close that window
![](https://blogger.googleusercontent.com/img/b/R29vZ2xl/AVvXsEhV9XiMpG8Fzjy3KdGOtIajDlcP5wp31-u_BgZhAIM_GDTeNexrdT0JW5Pds7k9219N3pkFor7jSkVZ8yEDEIi3XfpPt_9dzvfyBJWNuuXT2hIXEJ-ojcMc5FF5ZmB4naf_TTjfp1fcA4fU/s400/14.bmp)
19-And
OK again (on the
Gradient Fill Window)
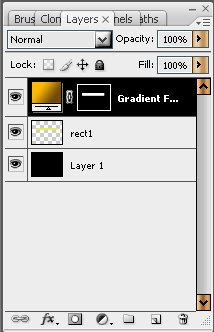
20- Your layer palette should be like this:
![](https://blogger.googleusercontent.com/img/b/R29vZ2xl/AVvXsEguNadKz8De3R96EyO-fopUrbSURlryPMQVDip2_VRmRQt5-zwIth5TvJNN5UYoyQVbhbW3H3LJUWlL_II55K3_dQEORwRk_RHTgO3H7Xgvjj7OZzeZSqQinvuFU2NOLQZk7kOfWgLPxOzG/s400/15.bmp)
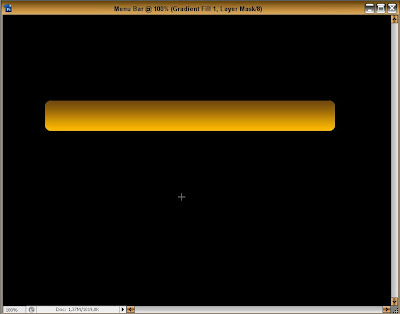
21- And your rectangle like this;
![](https://blogger.googleusercontent.com/img/b/R29vZ2xl/AVvXsEjXqb2Gi1qxj2DNO7Uqg7vILG3RlGK_cxwW6931MFaeUewttMBkHhCjRsdw6273bCxn0MhptHoIGOWy2TwZbhuaNUMl7RaovzeKFZ2h6cjisTM6hVMMzUTDN-_q0ZcXVBcEBKlylR3eS2KG/s400/16.bmp)
22- Create another layer by pressing
Ctrl+Shift+N23- Select the
Rounded Rectangle Tool again like on the 5th step
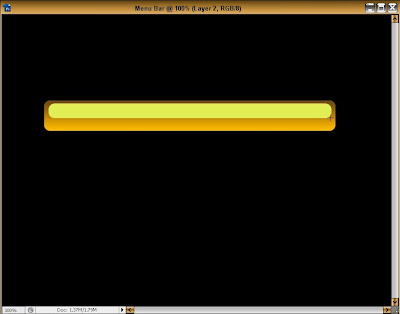
24- And draw something like this:
![](https://blogger.googleusercontent.com/img/b/R29vZ2xl/AVvXsEgwb-_RWDF1S24bBTO8rqjLA0-PYL0MDFRQ2j1n2bTASNWT2e54l3UEeci6tW1-eXl4BZTnVAqKcvFq2wtIfxfIHqutkZvJXUzvfBn1_bJ7qJx9mUwzW_N000a5czHGBb5xydchwZ2CqAEy/s400/17.bmp)
25- Go to
SELECT>LOAD SELECTION>OK (see step 8)
26- Now do
exactly the same as you did on step
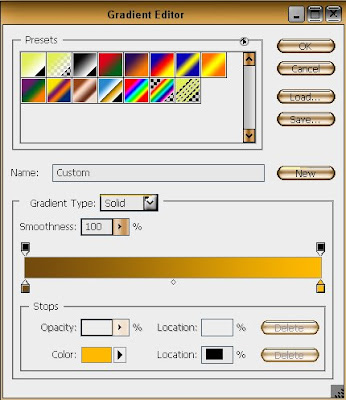
10, 11, 12, 13, 14, 15, 16 and 17 this time for the smaller rectangle and invert the colors, instead of: First the lighter color and then the darker one, choose the darker on first(left small box) and then the lighter color(right small box)
27- Here's your colors inverted from the first and bigger rectangle
![](https://blogger.googleusercontent.com/img/b/R29vZ2xl/AVvXsEgaM7c96uqd91ojipZgkGIdF8IPT1XCsrN4i-lQPb_s8Wyk7RLWYPHx_tJM9Rv8BE2LxRl17ksGa8Y2grG1vQBoesfXUQURq3ycQ9Il6ElMZBjRC7hBtjVuy369MPhEyVkeY233uiyGDy-N/s400/18.bmp)
28- And here's your rectangle with a great effect
![](https://blogger.googleusercontent.com/img/b/R29vZ2xl/AVvXsEjJtlUEt756P-0stz_7-V-vX9c7r59_lbml-PnE8fDyRay5q9bEWLi2_igAFJXctJriyoCbDcJ3yKZ8LvxvOluvPqwYi5nucu-XV3_oqoAy9o5rcva3ML-vxnwwDzWlfE-N95Tov_m1H63A/s400/19.bmp)
29- Now, add some text using the
Horizontal Type Tool![](https://blogger.googleusercontent.com/img/b/R29vZ2xl/AVvXsEi0hBR5pe3P5p7bMnenJ50fjdPIZQjueczhU0nNYG1YbLXgR1kODQEsXDkPWLAhbQRV_vXcE9C5XUJf-dS7-sM83ddIbhvLEpoG_MfYKjTW1yIw89iB_A8gKfEgAX1hOloK8ZYEZ7zZX6SL/s400/20.bmp)
30- And that's it! :)
1 comments:
Thanks a lot for your submission in my Photoshop Carnival. I have used your submission entry in my post. Please visit and give your valuable comments.
Post a Comment